Today, we’ll investigate the Monte Carlo method. Wikipedia, the ultimate source of truth in the (known) universe has this to say about Monte Carlo:
Monte Carlo methods (or Monte Carlo experiments) are a broad class of computational algorithms that rely on repeated random sampling to obtain numerical results. (…) Monte Carlo methods are mainly used in three distinct problem classes: optimization, numerical integration, and generating draws from a probability distribution.
In other words, the Monte Carlo method is a numerical technique using random numbers:
- Monte Carlo integration to estimate the value of an integral:
- take the function value at random points
- the area (or volume) times the average function value estimates the integral
- Monte Carlo simulation to predict an expected measurement.
- an experimental measurement is split into a sequence of random processes
- use random numbers to decide which processes happen
- tabulate the values to estimate the expected probability density function (PDF) for the experiment.
Before being able to write a High Energy Physics detector simulation (like Geant4, Delphes or fads), we need to know how to generate random numbers, in Go.
Generating random numbers
The Go standard library provides the building blocks for implementing Monte Carlo techniques, via the math/rand package.
math/rand exposes the rand.Rand type, a source of (pseudo) random numbers.
With rand.Rand, one can:
- generate random numbers following a flat, uniform distribution between
[0, 1)withFloat32()orFloat64(); - generate random numbers following a standard normal distribution (of mean 0 and standard deviation 1) with
NormFloat64(); - and generate random numbers following an exponential distribution with
ExpFloat64.
If you need other distributions, have a look at Gonum’s gonum/stat/distuv.
math/rand exposes convenience functions (Float32, Float64, ExpFloat64, …) that share a global rand.Rand value, the “default” source of (pseudo) random numbers.
These convenience functions are safe to be used from multiple goroutines concurrently, but this may generate lock contention.
It’s probably a good idea in your libraries to not rely on these convenience functions and instead provide a way to use local rand.Rand values, especially if you want to be able to change the seed of these rand.Rand values.
Let’s see how we can generate random numbers with "math/rand":
func main() {
	const seed = 12345
	src := rand.NewSource(seed)
	rnd := rand.New(src)

	const N = 10
	for i := 0; i < N; i++ {
		r := rnd.Float64() // r is in [0.0, 1.0)
		fmt.Printf("%v\n", r)
	}
}
Running this program gives:
$> go run ./mc-0.go
0.8487305991992138
0.6451080292174168
0.7382079884862905
0.31522206779732853
0.057001989921077224
0.9672449323010088
0.6139541710075446
0.01505990819189991
0.13361969083044145
0.5118319569473198
OK. Does this seem flat to you? Not sure…
Let’s modify our program to better visualize the random data. We’ll use a histogram and the go-hep.org/x/hep/hbook and go-hep.org/x/hep/hplot packages to (respectively) create histograms and display them.
Note: hplot is a package built on top of the gonum.org/v1/plot package, but with a few HEP-oriented customization.
You can use gonum.org/v1/plot directly if you so choose or prefer.
func main() {
	const seed = 12345
	src := rand.NewSource(seed)
	rnd := rand.New(src)

	const N = 10000

	huni := hbook.NewH1D(100, 0, 1.0)

	for i := 0; i < N; i++ {
		r := rnd.Float64() // r is in [0.0, 1.0)
		huni.Fill(r, 1)
	}

	plot(huni, "uniform.png")
}
We’ve increased the number of random numbers to generate to get a better idea of how the random number generator behaves, and disabled the printing of the values.
We first create a 1-dimensional histogram huni with 100 bins from 0 to 1.
Then we fill it with the value r and an associated weight (here, the weight is just 1.)
Finally, we just plot (or rather, save) the histogram into the file "uniform.png" with the plot(...) function:
func plot(h *hbook.H1D, fname string) {
	p := hplot.New()
	hh := hplot.NewH1D(h)
	hh.Color = color.NRGBA{0, 0, 255, 255}
	p.Add(hh, hplot.NewGrid())

	err := p.Save(10*vg.Centimeter, -1, fname)
	if err != nil {
		log.Fatal(err)
	}
}
Running the code creates a uniform.png file:
$> go run ./mc-1.go
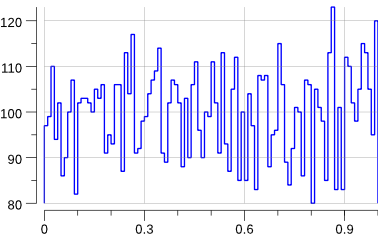
Indeed, that looks rather flat.
So far, so good. Let’s add a new distribution: the standard normal distribution.
func main() {
	const seed = 12345
	src := rand.NewSource(seed)
	rnd := rand.New(src)

	const N = 10000

	huni := hbook.NewH1D(100, 0, 1.0)
	hgauss := hbook.NewH1D(100, -5, 5)

	for i := 0; i < N; i++ {
		r := rnd.Float64() // r is in [0.0, 1.0)
		huni.Fill(r, 1)

		g := rnd.NormFloat64()
		hgauss.Fill(g, 1)
	}

	plot(huni, "uniform.png")
	plot(hgauss, "norm.png")
}
Running the code creates the following new plot:
$> go run ./mc-2.go
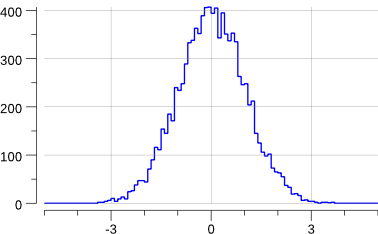
Note that this has slightly changed the previous "uniform.png" plot: we are sharing the source of random numbers between the 2 histograms.
The sequence of random numbers is exactly the same than before (modulo the fact that now we generate -at least- twice the number than previously) but they are not associated to the same histograms.
OK, this does generate a gaussian.
But what if we want to generate a gaussian with a mean other than 0 and/or a standard deviation other than 1 ?
The math/rand.NormFloat64 documentation kindly tells us how to achieve this:
“To produce a different normal distribution, callers can adjust the output using:
sample = NormFloat64() * desiredStdDev + desiredMean“
Let’s try to generate a gaussian of mean 10 and standard deviation 2.
We’ll have to change a bit the definition of our histogram:
func main() {
	const seed = 12345
	src := rand.NewSource(seed)
	rnd := rand.New(src)

	const (
		N      = 10000
		mean   = 10.0
		stddev = 5.0
	)

	huni := hbook.NewH1D(100, 0, 1.0)
	hgauss := hbook.NewH1D(100, -10, 30)

	for i := 0; i < N; i++ {
		r := rnd.Float64() // r is in [0.0, 1.0)
		huni.Fill(r, 1)

		g := mean + stddev*rnd.NormFloat64()
		hgauss.Fill(g, 1)
	}

	plot(huni, "uniform.png")
	plot(hgauss, "gauss.png")

	fmt.Printf("gauss: mean=    %v\n", hgauss.XMean())
	fmt.Printf("gauss: std-dev= %v +/- %v\n", hgauss.XStdDev(), hgauss.XStdErr())
}
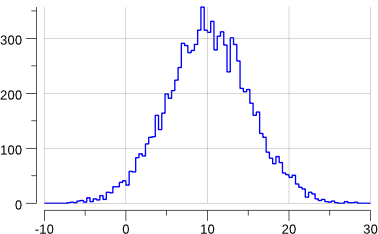
Running the program gives:
$> go run mc-3.go
gauss: mean=    10.105225624460644
gauss: std-dev= 5.048629091912316 +/- 0.05048629091912316
OK enough for today.
Next time, we’ll play a bit with math.Pi and Monte Carlo.
Note: all the code is go get-able via:
$> go get github.com/sbinet/blog/static/code/2017-10-11/...